Saturday, December 21, 2013

less is more: any previous challenge

This week at Less is More we are challenged to make a card based on ANY of the previous challenges.

  I have decided to go right back to the beginning to week 2 and the very first one layer challenge - a flower or a tree and show this card that I have made for my mum's birthday.
i think that all of the stamps are hero arts except the splatter which is PaperArtsy

Sunday, December 15, 2013

Quick Birthday card

I just needed to make a birthday card today, and wanted something pretty. The swirl and splatter are both PaperArtsy but the happy birthday is not. The flower is punched and then made 3d using an embossing tool on the back.


Thursday, December 12, 2013

christmas bagelope

After making the bagelope for my guest designer spot at PaperArtsy, I realised I needed another to wrap a present for a friend
Before folding the envelope I stamped it with stamps from this set in brown inks, and again onto a white tag.
I also used the splatter from this set using white ink. The bell is from a set of 10 from the poundshop
The instructions for the bagelope are here.
I wish I could enter the challenge, but I think I wouldn't be allowed to!!

my final guest designer week at PaperArtsy

Have you seen my final week as guest designer on the PaperArtsy blog? I'm concentrating on last minute gifts and wrapping.
Of course there's a challenge, and you can win stamps.

Although I've officially finished my guest designer work at paperartsy, I'll still be popping up... to make sure that us clean and simple crafters are still represented!!

Tuesday, November 26, 2013

less is more: christmas card- use a bird

The theme at Less is more this week is to use a bird on a Christmas card.
For the Christmas cards that I make for my book group each year I try to incorporate book pages somewhere on the card. So, that was what I had in mind while making this.
Also every time I see this leaf die from the grunge flower #1 set from PaperArtsy, it reminds me of a bird, so I thought it was time to try it out in that way.
I have used PaperArtsy paints too. The blood orange (for the red breast) and spiced paprika (for the body) are both translucent so show the words through well. The cinnamon (main body) is semi-opaque, so gives a bit more coverage but not too much. I only applied a tiny amount of the paints, anyway, for a subtle hint of colour.

I drew on the eye and feet with a fine tipped marker.

The words are from PaperArtsy's squiggly ink range.

p.s. sorry, I know it's tuesday, but I have no new chutney recipes this week!

Tuesday, November 19, 2013

Chutney Tuesday: Persimmon, fresh cranberry and chilli chutney

I didn't even know what persimmons were before I bought the ingredients for this chutney. They had them in asda and I thought they looked interesting. A quick google told me that they were a bit like mangoes so I thought they would be good for chutney. They also had fresh cranberries, so I didn't have to make do with dried ones. Then I saw these skinny green chillies and my ingredients were decided.

during the cooking this chutney looks particularly unappetising. it goes a disgusting shade of pale pink and turns scummy, but keep going, it sorts itself out in the end.

Watch this one carefully for burning. I don't know why but this one seemed to try to burn a lot more than other recipes I have done.

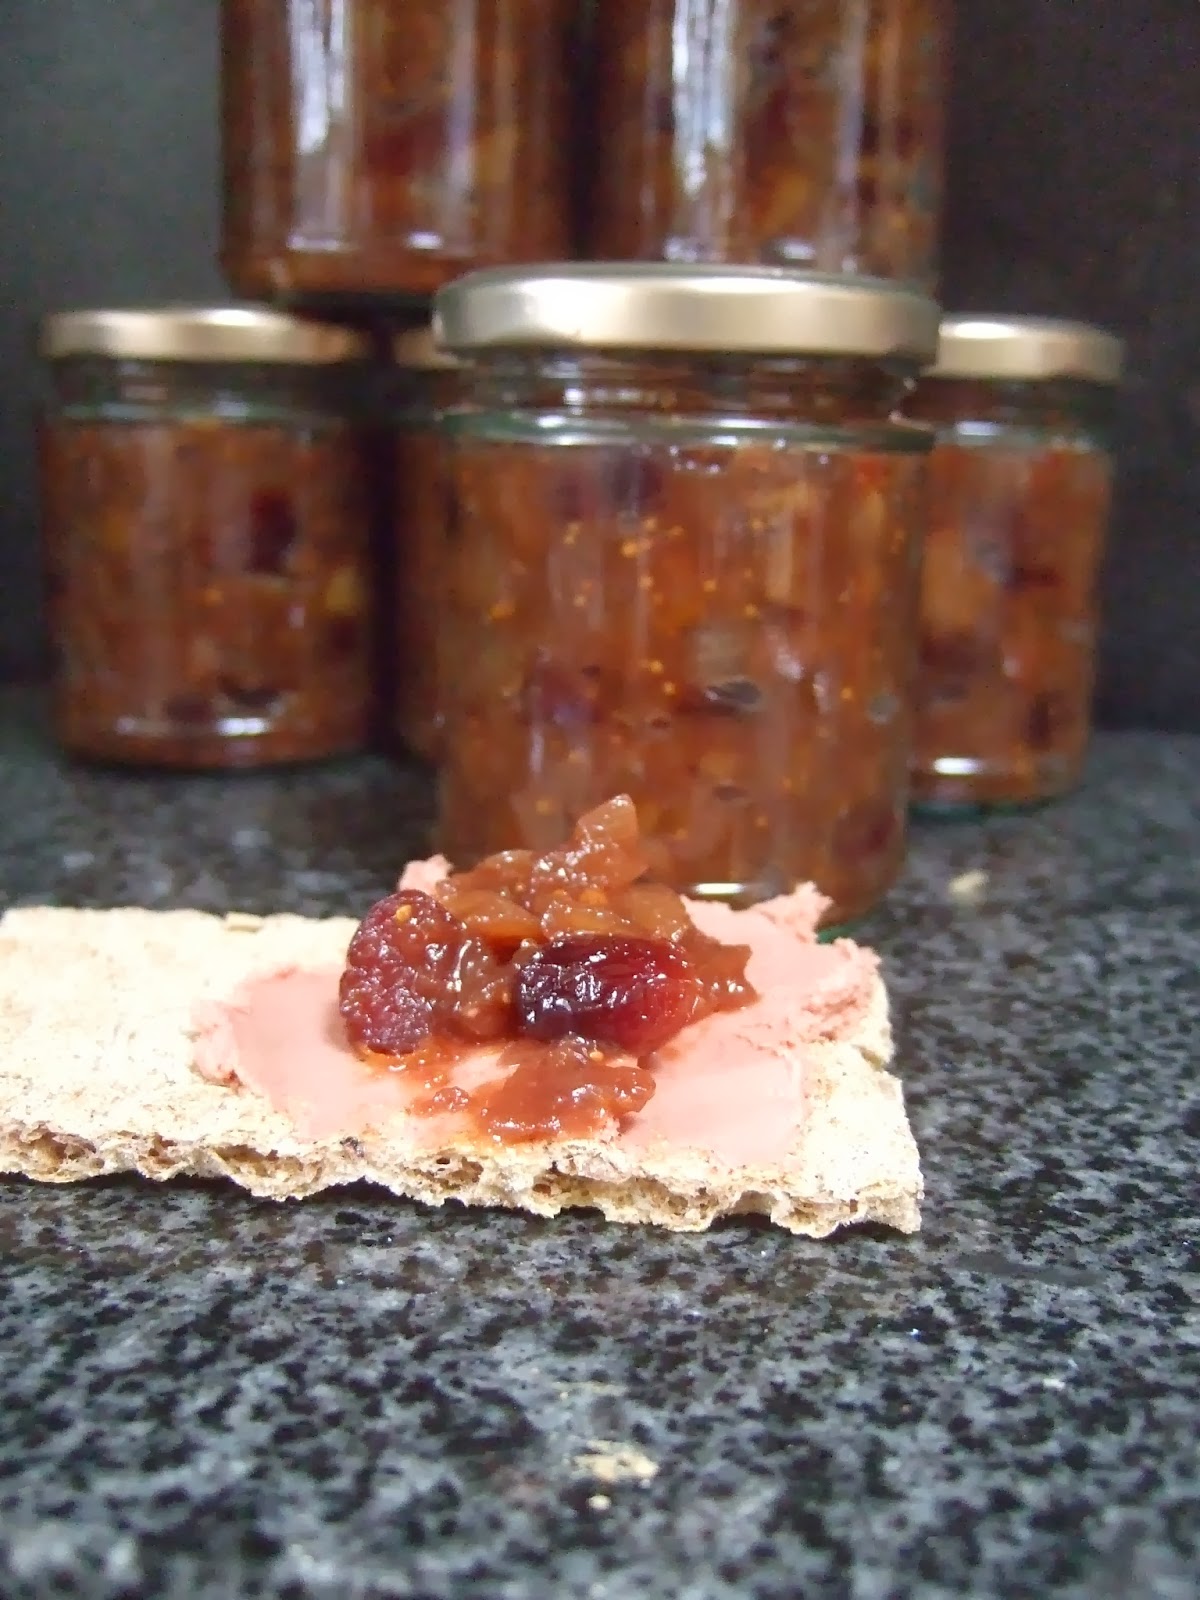
makes approx 9-10 200ml jars.
ingredients:

2 tbls veg oil
6 small persimmons (approx 1kg)
fresh cranberries (300g)
1 large cooking apple (420g)
2 white onions (approx 400g)
350ml cider vinegar (350ml is one bottle of asda own brand)
350g white granulated sugar
6 thin green chillies
1 clove garlic
1/2 inch fresh ginger
2 tsp ground coriander
2 tsp ground cumin

dice apples, onions and persimmons. finely chop garlic and ginger. finely slice chillies.

fry onions until starting to soften. add chillies, garlic, ginger and spices until thorougly soft.
add persimmon, apple and whole cranberries and cook for 2 more minutes turning all of the time.

add vinegar and sugar, cover and cook for 5 minutes until fruit looks soften abd cranberries split.
cook uncovered until jammy in appearance and a spoon can be dragged through leaving a clear channel (about 30 mins)

transfer to sterlised jars and store.

Friday, November 15, 2013

my third week as guest designer at PaperArtsy


This week on the PaperArtsy blog (here, here and here) I have concentrated on making cards suitable for batch-making for christmas.
Don't forget to take part in the challenge to win stamps! there's still time

Saturday, November 02, 2013

less is more- photo inspirations

This week at Less is more, we are challenged to use this photo


to inspire our use of dark card with a splash of colour.

I made a simple heart stencil from post-it notes and then stamped through it using the small splatter stamp from this paperartsy set and some opaque paints from the fresco range of paints (I used guacamole, sky and cheesecake)


I finished by stamping the sentiment with cheesecake paint.

PaperArtsy opaque paints, work brilliantly on dark card, and a lovely to stamp with.

Tuesday, October 29, 2013

Chutney Tuesday : Spicy Plum Chutney

This recipe is based heavily on a BBC good food recipe that I used last year, and loved, but felt that it had more liquid than necessary, so I've just tweaked a few things about it.
recipe:

2 tbs veg oil
1kg Plums, finely chopped (inc skins)
4 red onions, finely diced
100g dried cranberries
10 g finely chopped ginger
2 gloves garlic finely chopped
1 small red chilli finely chopped
350 ml redwine vinegar
350g oft light brown sugar
1 tbls mixed spice


Fry onions for 1 minute, add chilli, garlic and ginger and fry until soft.
Add spices plums and cranberries and cook for another minute.
Add sugar and vinegar.
Simmer covered for 10 minutes (this ensures that even hard plums will soften thoroughly.
The simmer uncovered until chutney has a jam-like consistency (30 -40 minutes)
Spoon into sterilised jars whilst still hot, and seal.
makes spprox 7 200ml jars.

Sunday, October 27, 2013

Less is more - string or twine

I love this challenge theme at the Less is More Challenge, I have a bit of a thing for string it's so cheap yet adds a lovely rustic feel to projects.
At first, I was just going to use it to hang a bauble on a card, so went straight to this Jofy set of stamps. Then I spotted the "trunk" of this christmas tree and thought it would be perfect to be made of string.

I stamped it once onto the base card and glued the string directly over the trunk. I stamped it again onto card and coloured with a combination of pencils and marker pens. The attached with 3D foam.

I finished with some more string to further highlight the theme.

I have been working with string in another way this week. A friend asked me if there was anything I could design that you could pop over a salsa jar so you could put them straight on a table without looking cheap. I thought that a string based cover added a nice rustic feel to a table and made these covers by crocheting string. Very easy to do, double crochet (US single crochet) into the back loop only of previous row, until it fits round the jar stretched. Make it as wide as you want to cover the label on your particular jar. Mine is 9 stitches wide.


Saturday, October 19, 2013

My PaperArsty Guest designer week and the less is more challenge

Have you checked out my week as guest designer on the PaperArsty blog this week. I've ben using dies in a variety of ways.There's a challenge you can take party in to win stamps, by making something inspired by my pieces. the challenge is here, and you can see below a sneak peak of my samples. Check out the full projects
here, here and here

You have until noon tomorrow to enter, and as most of my projects are very quick amd simple, you have plenty of time!

I decided to use one of the techniques from my GD week to make this card for the Less is More Challenge this week. The theme is Trees. Now I don't have any tree dies so I decided to handcut the aperture of this card (just draw it on the back, no one will even see the pencil lines). This card only took about 10 minutes, so there really is still plenty of time to enter the PaperArsty Challenge.

The paints I used are Tinned Peas, Hey Pesto and Guacamole, from PaperArsty's range of fresco paints. And the words are from a JoFy christmas plate, the splatter is of course the well used Mini 72

I'd love you to come and take part in my challenge at PaperArtsy, It's such a thrill looking at all the artwork.

Tuesday, October 15, 2013

Chutney Tuesday: Joanne's Christmas Chutney

This was a highly experimental Chutney recipe, but I think it worked out okay.

I wanted to make a chutney that combined all the flavours and smells that make me think of christmas.

recipe

vegetable oil
3 Parsnips
2 cooking apples
3 medium onions
15g ginger
6 dried figs
100g dried cranberries
1 tsp cinnamon
2 tsp mustard seeds
1/2 grated nutmeg
350ml red wine vinegar
100mls dry sherry
250g soft dark brown sugar
zest of half orange


Peel, chop and roast parsnips (coat with oil) at 220 degrees celsius for about 20 minutes until soft but not too browned

meanwhile prepare other ingredients. Peel and chop apple into small chunks. dice onions. finely chop ginger. Chop figs quite small.

add ginger to oil and cook for a minute add onions and cook until soft. add spices and cook for another couple of minutes.

add apples, figs, cranberries, chopped up roast parsnip (will be quite mashy), orange zest, vinegar, sherry and sugar.

bring to boil and cook until jammy. Store in sterilised jars.

Saturday, October 12, 2013

less is more: one layer challenge witches and wizards.


 I took a slightly oblique look at this week's challenge on Less is More and instead of using a picture of a witch or wizard, I used the famous quote from one of the Witches in Macbeth.

I was inspired to do the moon and brayering by Martyn Parker and Barbara Gray, from their classroom session today!

The stamps are from PaperArsty Halloween 04. I used Faded jeans distress inks, and a lot of post-it notes.


Tuesday, October 08, 2013

Chutney Tuesday: Caramelised onion and Balsamic Tomato Chutney


Another of my own recipes. This is a very rich Chutney, if it's too rich you could increase the ratio of red wine vinegar to balsamic vinegar.

The onions take ages to cook so use your time efficiently by preparing the tomatoes while the onions cook.

I include all of the seeds and juice of the tomatoes (and the seeds of the chilli), but this is personal taste and could be omitted.

recipe:
2 tbls Oil
1 large white onion and 4 red onions (900g in total) sliced
approx 1.5g tomatoes (roughly 15 tomatoes) skinned, chopped into small chunks.
1 chilli pepper finely sliced
100g sundried tomatoes chopped very small
200 ml balsamic vinegar
50 ml re wine vinegar
250 g soft dark brown sugar

Cook onions in a large frying pan, in oil, very slowly over a lowish heat until caramelised (dark and sticky but not burned) this could take up to an hour. when almost done add a tbls of the sugar and cook a bit longer to caramelise further.
meanwhile prepare the tomatoes (use a blanching method to skin)

fry chilli in small amount of oil in large cooking pot, and all of the ingredients, bring to the boil and boil until reduced and jam like, (about 30 minutes)

transfer to sterilised jars and store.

Saturday, October 05, 2013

less is more: White on White Christmas

The theme at less is more is White on White but with the added stipulation that it must be a christmas card.
Of course this colour theme is just perfect for christmas.

I decided to go with a vellum-effect card (I don't really use Vellum- I use tracing paper, it works just as well.)
I also decided to use the fact that torn white card looks like snow.


The Stamp is by Crafty Individuals, and I have used moonlight white brilliance ink, which works perfectly on tracing paper.

Tuesday, October 01, 2013

Chutney Tuesday : curried peach and fig chutney

I couldn't resist the good value of the fruit available recently and was inspired to try making a peach based chutney.


recipe
2 tbls vegetable oil
12 peaches, peeled, stoned and chopped
6 small onions (500-550g) diced
4 figs, choped, stems removed
250ml white wine vinegar
250g light soft brown sugar
2 tsp garam masala
1 tsp dried crushed chillies
1 tsp cumin seeds (crushed in mortar and pestle)
1 tsp coriander seeds (crushed in mortar and pestle)

fry onion and spices in oil until softened, add all remaining ingredients, bring to the boil and cover, cook (stirring frequently) for about 20 mins or until peaches very soft.
continue to simmer uncovered for approx another 25 mins until has the appearance of jam and a wooden spoon can be dragged throough leaving a channel.
spoon into hot sterilised jars, and apply lids firmly.

makes approx 7 250ml jars

Saturday, September 28, 2013

less is more sketch#10

It's sketch week at Less is More, with this sketch


I'm starting to get into Christmas mode, so I made this card using Jofy stamps from PaperArtsy. The bauble is coloured with pencils and whispers pens (to get the depth of colour) and finished with  some glitter glue.


I had to trim the sentiment to make it fit, but I like it with the squiggles so I also made another card, similar but not following the sketch, which I shall be entering for One Layer Wednesday's Free For All Challenge.


.

Tuesday, September 24, 2013

Chutney Tuesday : spicy blackberry and apple chutney

If you are lucky enough to have a blackberry bush locally, here's a recipe to use all of those wonderful free fruit and continue to enjoy them over the coming months,

This is my own recipe and I'm absolutely thrilled with how it turned out, really tasty!

recipe
2 red onions and 1 white onion finely sliced
2 Bramley apples chopped into small chunks
400g blackberries (whole)
3g fresh ginger finely chopped (yes this is a tiny amount - it happened to be all I had)
1 clove garlic finely chopped
1 red chilli finely sliced including seeds
1tsp cinnamon powder
2 tsp mustard seeds
1 tbls oil
250 ml red wine vinegar
250g dark soft brown sugar.

Fry onion, garlic, chilli and ginger in oil, until softened. Add apples, blackberries, cinnamon, mustard seeds, vinegar and sugar.
Stir well bring to simmer and slowly increase to a boil, cook uncovered for approx 25 mins, stirring regularly to ensure it doesn't burn, until you can drag a wooden spoon through and it doesn't fill immediately. The appearance is similar to blackberry jam.
Transfer to hot sterilised jars. ( I just run them through hot cycle, top rack, of dishwasher) store in cool dark place for as few weeks, or as long as you want. Flavours develop with time, and should keep for ages)

Sunday, September 22, 2013

less is more: fabric

The theme at less is more is fabric. I went the easy route and made a fabric flower.
 I have decided to do a quick tutorial for this flower.

 first use PaperArtsy's grunge flower #1 to cut a flower and leaf from felt. These dies cut so easily through felt.
 then trim as shown
 roll up, not too tightly.
 glue last bit in place and then glue to leaf

 squish, to open up the flower


Stamp a background, and attach flower.
The stamps I used are a splatter, script and sentiment, all from PaperArsty


Tuesday, September 17, 2013

my first guest designer week at Paperartsy.

If you haven't already seen it, I am happy to announce that I have been the guest designer on the PaperArtsy blog this week. I had projects featured sunday, monday and tonight (see the sneak previews above)
There's also a challenge to make something inspired by my projects, to win some stamps.
of course my pieces are all really quick and simple so it won't take you long to enter! I hope you enjoy.

Sunday, September 15, 2013

Less is more: get well soon.

It's One Layer week at Less is more, so I just had to take part. The theme is get well soon. I decided just to go with the sentiment and simple embellishment. The sentiment is a studio G stamp, and the flourish is by PaperArtsy and stamped with jenni bowlin stick candy ink


and is the perfect size for this stamp. I finished by simply dotting pink glitter glue (cheap Craft Planet stuff) around the flourish. Job done!

p.s. keep an eye on the PaperArsty blog tonight, I'm not saying why....

(back at you, Laura!)

Friday, September 13, 2013

one layer wednesday: it's all about the sentiment.

I can't resist a good one layer challenge. This week the theme at OLW is "it's all about the sentiment"
I immediatly knew that I would use this sentiment from PaperArtsy, it's a great sentiment but it's also a nice big stamp which makes it a great focal stamp.

I am also entering this card for Daring Cardmaker's theme of "signature style". This is most definitely my signature style, right down to using the splatter stamp, which I seem to use all of the time!


I have overstamped with fresco Hey Pesto paint, which is a transparent paint meaning that you can stamp it over the sentiment and it won't obscure any detail. The stamps I used are the splatter (my favourite stamp) from this set and the flourish from this set.

I decided that the card needed a little more detail, I thought about adding some embellishments but decided that I wanted to keep it truly one-layer so decided to add some pink splatters.

*first problem: no pink paint! so I mixed some London bus(transparent) and nougat (opaque) to make a gorgeous pink.

*second problem: this paint was opaque(which I wanted it to be so it would sit above the green) which meant I couldn't stamp it as it would obscure some of the lettering. So I applied it with the end of a paintbrush, just dotting it wherever I felt it needed it.


I really like how it came out, and the best thing was the whole thing took less than 5 minutes!

 (you may note that I've been using a lot of PaperArsty recently, it's kind of taken centre stage on my craft table for a good reason which will be revealed very soon!)

Thursday, September 12, 2013

Tag Along Challenge: Polka Dots

This is the first time that I have taken part in the new challenge "Tag Along". I couldn't resist a polka dot challenge, especially as I have had this idea floating around in my head for a couple of weeks. The flower was created by "inking" up a solid style stamp with paint and then adding dots with a different colour paint directly to the stamp using the eraser end of a pencil.

I found that it was important to use as little paint as possible, or else the stamp will easily slip on the paper.

The tag itself is a #2 tag from PaperArtsy. Which is also where the paints and stamps are from (links below)


The script is stamped with paint, just lightly touching the tag to the stamp to use only a small part of the stamp. I inked the edges of the tag with brushed cordruoy distress ink and stampes the "smile" and splatter with the same ink. I added a polka dot ribbon, which I inked first with the distress ink.


 Finally, I decided to mount the tag to a card.

materials
Paints: Sky and Guacamole
stamps:  script, flower. smile, splatter
tag: #2